How to Use Self-Clean on an Oven

One of the most dreaded chores in the kitchen is cleaning the oven, especially an oven that has been neglected after several boil-overs and spills. But, you’re in luck if you have an oven with a self-clean feature. Using the self-clean cycle is simple—all it takes is a small amount of prep time, some patience, and a quick final wipe-down.


How Often to Use the Self-Clean Oven Cycle

Typically, the recommendation for running the self-clean cycle is every six months, maximum. How often you need to use it depends on the frequency of oven use and your cooking and cleaning habits.

Before You Begin

Always consult your oven model’s use and care guide. If you have lost the operating manual, most are available online from the manufacturer. Self-clean cycles can last from one to five hours so plan to do the cleaning during times you will not need the oven. The oven door will lock. Do not attempt to stop the cycle once it has begun or open the door until the cycle is complete.

Because of the high temperature, the self-clean cycle produces smoke and fumes as it incinerates the soil in the oven. It is important to keep the kitchen well-ventilated during the process to help clear smoke and odors. Do not block the oven vents so air can move freely.

Clear the Oven

Be sure that there is nothing—cookie sheet, broiler pan, aluminum foil, temperature probe—left in the oven. Check the operating manual to be sure the racks are self-cleanable. Most racks, especially stainless teel racks, should be removed before using the self-clean feature.

Since the self-cleaning cycle exhausts through a vent on the stovetop, you should also remove anything on top, such as spice containers if you store them on the ledge above your stove and oven dials or trivets kept on the stovetop. If you hang towels or oven mitts from the oven door, remove those as well.

Wipe Down the Door Seal

Dip a lint-free microfiber cloth in warm water and wring until just damp. Wipe the inside edge of the oven door and around the door frame to remove any crumbs or soil that might prevent a good seal. Take care not to move or bend the gasket around the door.

Increase Ventilation in the Kitchen

To help remove excess heat and fumes, turn on the range hood to increase ventilation in the kitchen. Open windows and turn on overhead fans, if possible.

Lock the Door and Select the Cycle

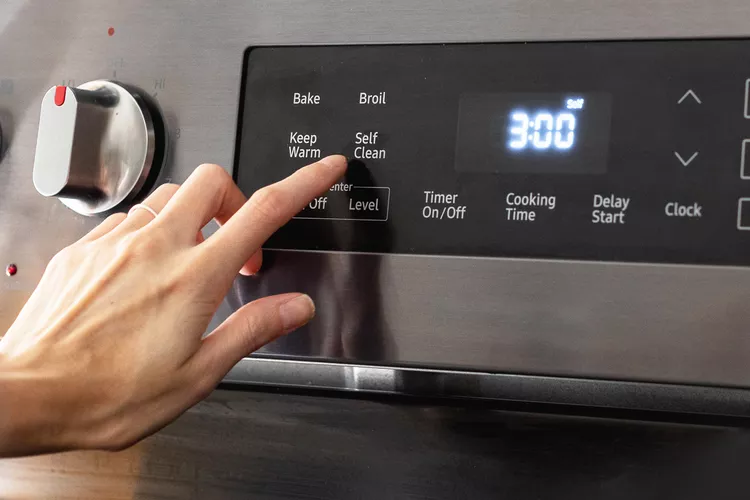
Most oven doors will lock automatically when you select the self-clean cycle. If it does not, lock it manually. Select the self-clean cycle on the control panel and let it run.

Clean Away the Residue

The oven door will not unlock until the interior temperature has dropped to a safe level. When the cycle is complete, open the door and use a damp microfiber cloth to wipe away the ashy residue that remains on the sides and bottom of the oven.

Reassemble the Oven

Clean any oven racks that have been removed from the oven by washing them in hot, soapy water with a scrubbing sponge. Rinse, dry, and replace the racks. The oven is ready to use.

Clean the Oven Exterior

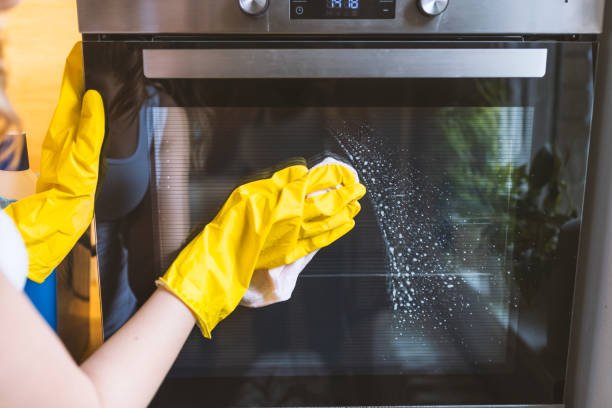
Now that the inside of your oven is clean, it’s a good time to clean the exterior of the door and the control panel. How you clean depends on the type of surface but most can be cleaned with a microfiber towel dipped in hot, soapy water. Wipe down the surfaces and then dry with a fresh towel.

Tips for Getting the Best Results From a Self-Clean Oven

  • Wipe up spills as soon as the oven is cool enough to clean safely.
  • Do not use any type of commercial oven cleaner at the same time as the self-clean cycle.
  • Do not leave any bakeware, oven liners, or utensils in the oven during self-cleaning.
  • Check your operating manual for instructions on how to clean the oven racks. Most should be removed during the self-clean cycle.
  • Run the self-clean cycle before soil levels are heavy. It is nearly impossible for the self-cleaning feature to remove thick layers of burnt-on food in one process.

Book a professional service

Sometimes greasy build-up in ovens is simply too challenging to be removed. Moreover, a thorough oven cleaning can be time-consuming and not exactly a very pleasant job. Fortunately, Shining Oven has professional range cooker cleaners that have all the necessary tools and skills to deal with any cleaning situation and bring your Rangemaster oven back to life. We offer a range of cleaning services, created specifically to eliminate bacteria, viruses, and carbon residue while improving the overall energy efficiency and performance of your appliances. If you are worried that you don’t have enough time to deal with deep oven cleaning, feel free to contact us and we will be happy to come to your rescue.
cleaning oven door

How to easily clean a Rangemaster oven door

Cooking can be fun. Enjoying delicious homemade meals prepared in a Rangemaster oven is even better! However, the mess left behind can take away from the joy of cooking. After all, everyone wants a clean oven. A spotless oven door is more hygienic, better and it prevents unpleasant burnt smell and smoke from greasy splatters. But how can you achieve a sparkling oven? If you are wondering how to clean a Rangemaster oven door, you are in the right place. We know just how weary thorough deep clean can be, unless, you know where to begin. To help you continue easily checking on the cooking progress through a sheer clean over door, we have prepared a few handy tips for you.

So, if:

  • It’s time you give your Rangemaster oven door a deep clean;
  • You want to clean your oven on your own;
  • You want to remove the oven door glass to clean it;
  • You want to learn the best techniques;

Then, keep on reading.

How to clean a Rangemaster oven door?

Before we get into any details, it is important to mention that cleaning is much easier when done after every use. This will prevent oven cavity and dirt build-up, as well as make the thorough cleaning process later much faster. But don’t worry, we know how hard this can be, so no need to feel guilty if you can’t always find the time for this habit. Thankfully, there’s a way to get your Rangemaster oven door as immaculate as the day you got it in.

Cleaning tips:

  • If you have steam cleaned the oven earlier on, the grease stains should have softened, so it is worthwhile using steam in advance.
  • Be careful when working around the door sealers. Avoid getting into contact with them, it can damage the sealers, or displace them.
  • Always follow the manufacturer’s instructions on the back of the product. If unsure whether the cleaning product is suitable, test it on a small, inconspicuous section.

How to clean a Rangemaster oven glass door?

A clean Rangemaster oven glass door is important, not only for health reasons but also from an aesthetic point of view. If the glass is dirty, looking through it will seem as if the whole oven is dirty. Moreover, you won’t be able to see clearly through it and check on the food that is cooking inside.

There are numerous methods and commercial products but again the all-time favourite hot soapy water or a cream cleaner can as easily achieve shiny results. One advantage of Rangemaster oven glass doors is that they can be easily removed for more convenient cleaning. Here is a step-by-step guide on how to approach the task:

Time needed: 45 minutes.

  1. Unplug your appliance.

    Disconnect the Rangemaster cooker and make sure the oven has cooled down.

  2. Unscrew the inner glass.

    Using a screwdriver, remove the screws holding the inner glass in place.

  3. Detach the glass door.

    Carefully remove the glass door and place it over a towel to be cleaned.

  4. Make a cleaning solution of warm water and dish soap.

    Use warm water mixed with liquid dish soap and a soft cloth to clean the glass. For a grease build-up use cream cleaner.

  5. Wipe dry the glass.

    Dry the glass thoroughly by wiping the soapy solution off to make sure all water is absorbed. This is to avoid dried droplet spots.

  6. Attach the glass and tighten the screws.

    Place the now clean glass in its place and screw it back.

  7. Enjoy your clean oven.

    Finally, you can step aside, enjoy the results and unleash your inner culinarian again!

Book a professional service

Sometimes greasy build-up in ovens is simply too challenging to be removed. Moreover, a thorough oven cleaning can be time-consuming and not exactly a very pleasant job. Fortunately, Shining Oven has professional range cooker cleaners that have all the necessary tools and skills to deal with any cleaning situation and bring your Rangemaster oven back to life. We offer a range of cleaning services, created specifically to eliminate bacteria, viruses, and carbon residue while improving the overall energy efficiency and performance of your appliances. If you are worried that you don’t have enough time to deal with deep oven cleaning, feel free to contact us and we will be happy to come to your rescue.
cleaning a charcoal bbq

How to Clean a Charcoal Barbecue

А charcoal barbecue is a must-have for anyone with a garden and a love for juicy, grilled meat. These BBQs can give your food the most incredible smoky flavour and are also light and small, which makes them easy to store. However, the price you pay to have such great tasting meat comes later in the form of grime build-up and an ash catcher, filled to the brim.

So, if you:

  • have grease build-up on your charcoal barbeque grill;
  • are searching for a natural and eco-friendly way to clean your BBQ;
  • want to learn how to maintain your barbecue clean for longer.

Read along!

The materials you’ll need

Before you begin cleaning the appliance, make sure to equip yourself with the following items to achieve the best results possible:

  • A nylon sheet
  • Rubber gloves
  • Grill brush or any other type of hard bristle brush 
  • A big container full of soapy water (not mandatory)
  • Sponge
  • Microfibre cloth
  • Plastic putty knife

How to clean a charcoal BBQ

If you’ve never cleaned your charcoal barbecue before, brace yourself, because things will get literally dirty.

  1. Find a suitable place for BBQ cleaning – Choose an area in your garden away from walking paths or driveways. You will be brushing a lot of encrusted char and ash, and you don’t want that to fall on any walking areas. Also, place a nylon sheet under the BBQ, so the ground can be protected during the cleaning.
  2. Clean the lid exterior – Use warm soapy water and a sponge to remove any dust and dirt. Afterwards, dry the lid exterior with a microfiber cloth.
  3. Light the grill – Any burnt leftovers will carbonise when heated. If you’ve ever wondered how to clean out a charcoal BBQ easily, this is it. Light your grill as you normally would, and put the lid on. This will allow the heat to make the food leftovers and splatters dry and non-greasy.
  4. Clean the lid on the inside – Wait for the lid to cool down a bit and scrape off the carbonised grease with your plastic putty knife. Afterwards, use your grill brush to remove the fine pieces of char and finish by washing with warm, soapy water.
  5. Clean the grill grates – Remove the grates. Dip them in the container full of soapy water, and scrub them with your grill brush. This will help to soften the nasty build-up. Mind you, a water container is not mandatory. You can clean the grates while they’re inside the BBQ as well
  6. Clean the bowl – Again, with your putty knife, scrape off any left black flakes of grease. Afterwards, get your grill brush and clear out any leftovers.
  7. Clear out the ash container – Any charcoal grill model has a container of this sort where the ashes are stored. Too much ash build-up can obstruct the vents of the grill and make it difficult to control the temperature when cooking.

How to maintain a charcoal BBQ

You don’t need to do anything to the BBQ when you don’t use it. It won’t get dirty on its own. However, you need to know how to clean your charcoal BBQ after each use. Here is how:

  1. Empty the ash catcher – You don’t have to wait for it to be full to throw it out.
  2. Clean the grates – Preheat the grill and brush it with a grill brush. If you don’t have one at your disposal, use a ball made of tin foil. You can hold this ball in your cooking tongs, instead of getting your hands dirty.
  3. Oil the grates – Oil prevents food from sticking to the grill. Saturate a clean rag with the oil of your choosing and rub the grates carefully. Oil shouldn’t drip into the coals, so don’t oversaturate the rag and don’t press too hard.

What to do after the grilling season is over

Once the season ends, you need to take measures to ensure your charcoal BBQ will be ready for next year. You will thank yourself later when the new season starts.

  1. Empty the BBQ of ashes.
  2. Wash the grates, bowl, and lid.
  3. Oil the cooking grates. You already know that oil makes the surface non-sticky, but it also protects the grates from rust.
  4. Cover the entire charcoal BBQ grill with a waterproof cover. If you have a garage, even better. Place the BBQ inside.

Do you need a professional BBQ cleaning service?

If you’re not up to the cleaning task and want to spend your time on more pleasurable activities, then book our professional BBQ cleaning services. ShiningOven works with experienced and fully equipped technicians who clean all barbecue models regardless of brand. They will disassemble all removable parts and place them in a dip tank, whilst cleaning the rest of the appliance. Once the service is done, the specialist will put everything back together and perform one final inspection. Afterwards, you can use your BBQ right away.

How to clean between oven door glass easily

How to Clean Between Oven Door Glass Easily

Oven glass panels appear to be perfectly sealed, but splattered food can never cease to surprise you. Eventually, you will see streaks between the two glass panels. So, how do you clean the inside of your double glass oven door without opening it? We will examine the two best methods below, so read on.

So, if you:

  • Need to clean between your oven door glass;
  • Are looking for ways to do it;
  • Want to know how to disassemble the door,

Then read on! This article will answer your questions.

The Old Hanger Method

Mind you this approach may not work for all ovens. Appliances vary in terms of build and functions. If you are unsure of how well you can perform this task, do not hesitate to call professional oven cleaners. This will save you a lot of appliance repairs headaches in the long run. Keep in mind, the oven cleaning cost can change based on a variety of factors, like whether your oven is a single door or double door.

With that said, here’s how to clean between oven glass:

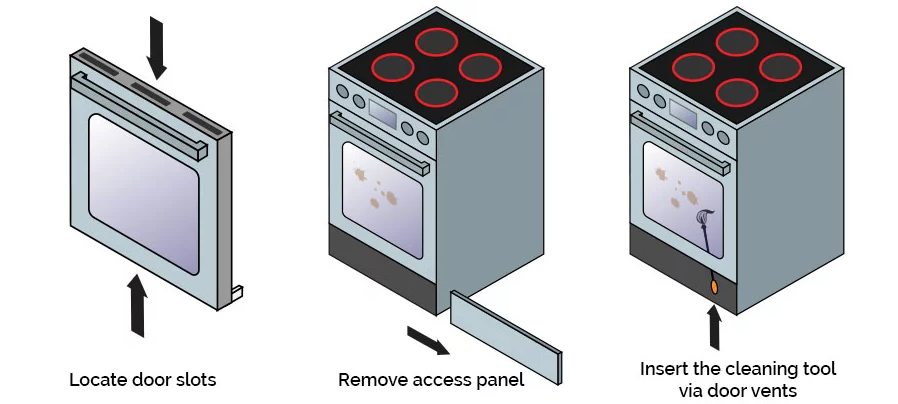
  1. Locate the door slots – most oven doors have vents at their top or bottom which are often how schmutz gets in between the glass panels. If you fail to notice them on the top, they’re likely on the bottom.
  2. Remove the access panel from the bottom of the cooker to gain better access to the vents. Usually, there are about 3 to 4 slots depending on the oven model, but it’s not a rule of thumb. KitchenAid oven, for example, has 8 slots.
  3. Shape an old coat metal hanger into a cleaning tool. It’s durable and won’t break while inside the oven door. You can also use a bottle brush or a fly swatter as an alternative. The point here is to have a tool which can easily go inside without breaking, it doesn’t really matter what material it’s made of.
  4. Attach an old piece of cloth securely with a thread to the coat hanger. Won’t fall apart while inside the oven door. Also, the rag needs to be thin because the space inside the oven door is pretty scarce.
  5. Pour some lukewarm water into a container and add dish soap. Stir until you get bubbles and you’re set to go. Prepare another container with clean warm water. This will be later used for rinsing. You can also use a glass cleaner as a stronger alternative, but even so, don’t skip the rinsing part.
  6. Insert the cleaning tool between the glass panels via the exhaustion vents. Work your way from one side to the other whilst using all slots. Be cautious not to leave any soap residue after cleaning. Once you’ve cleaned all the drips, rinse the oven door with your tool.

The Disassembly Method

If you see that streaks still remain and the previous method was not effective enough, you can take apart the door. This method is highly unrecommended by professionals because it’s harder to put everything back together once you’re done with the cleaning. If you still feel you can do it, read along.

Mind you, the instructions presented here may vary depending on brand oven ranges and should not be performed by unqualified personnel. Do this at your own risk.

  1. Turn off the oven from the mains and wait till it’s cool.
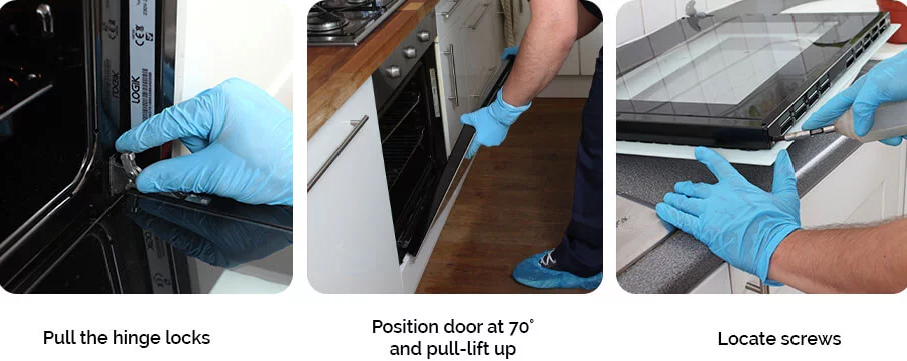
  2. Open the kitchen range door and pull the hinge locks from both sides. They are located at the lower right and left corners.
  3. Position the oven door at about 70°so you’d be able to pull-lift it up. For this task bring someone along as the door can be weighty.
  4. Locate the oven door screws. It usually has two to three screws on the bottom and two on the top near the handle depending on brands. KitchenAid is like that, while Samsung doors have their screws on the sides.
  5. Lift the top panel first, after unscrewing. Samsung doors have rubber seals on the sides, so be careful with those.
  6. Clean the glass panels before putting them back together. Caution, most oven doors have specials pins and slots which need to be perfectly aligned so the two panels can be safely screwed back together.
  7. Reattach the door by holding it at the same angle as when you first removed it. Insert the hinge arms into the hinge slots and enable the locks.

Some people don’t even bother to remove the door before disassembly, instead, they put it apart while it’s still attached to the unit. Again, we encourage you to not do this alone and instead call professional oven cleaners.

Experienced pros will not only clean between your glass panels, but your entire range cooker. They will disassemble the entire unit, clean all the parts and put everything back together just as it was. Book a service today

how to clean the cooker hood filter

How to clean the cooker hood filter

When was the last time you peeked underneath your stove’s hood and checked out the exhaust fan filters? If it’s been awhile or you’ve, um, never done this, let me warn you: it’s not going to be pretty. The purpose of a range hood filter is to collect grease, so if it’s doing its job correctly, it’s going to look and feel, well, greasy.

Over time, the the filter may become so blocked with grease and ickiness that it loses its effectiveness, which is why it’s important to clean these filters periodically.

What You Need

  • Very hot or boiling water
  • Degreasing dish soap (Dawn works very well)
  • Baking soda
  • Non-abrasive scrub brush
  • Paper towels or dish cloth

Instructions

  1. Remove the filters from the hood: Most filters should easily slide or pop out of the underside of the hood. Mine had a metal loop I could grab to push the filter up and slide it out.
  2. Fill a sink or bucket with boiling water: The hotter the water, the more effective. Depending on how hot you can get the water from your tap, that might be good enough. For me, I boiled water in my electric tea kettle, and poured that into the sink.
  3. Pour in baking soda and dish soap: Pour a good squirt of de-greasing dish soap and 1/4 cup baking soda into the hot water. Swish around with a brush (not your hand because it’s too hot!) until the water is nice and soapy.
  4. Put greasy filters in water: Submerge your greasy exhaust fan filters into the water. Make sure they’re completely covered.
  5. Let them soak: Allow the filters to soak for 10 minutes.
  6. Scrub the filters: After soaking, take a non-abrasive scrub brush and scrub the filters. Add more dish soap to your brush if required while you scrub.
  7. Rinse and dry: Rinse the filters thoroughly in hot water and dry with a paper towel or clean cloth.
  8. Replace the filters and repeat as needed: Put the filters back into the hood, and repeat as needed! Cleaning the filters once a month is a good maintenance strategy.

Book a professional service

If you are still not convinced that you have the time, desire, or skills to clean your cooker hood filter by yourself, then booking a professional appliance cleaning service is our next suggestion. ShiningOven technicians are available six days a week to lend a helping hand and get this chore off your list. Using efficient and safe antibacterial cleaning solutions, ShiningOven professionals would make your appliance sparkling clean and will improve its overall lifespan.

How to clean gas hob burner caps

How to Clean Gas Hob Burner Caps

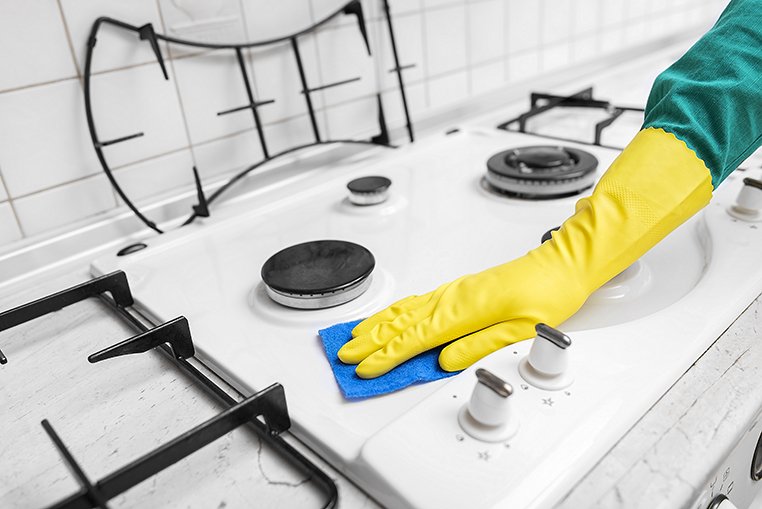
Cleaning any oven top can be a chore, and when you have a gas oven, it can be tough to get your head around cleaning all those nooks and crannies. The caps on the hob often get coated in splatters of food as well as burnt-on messes, so how do you clean it without breaking your hob?

Safety First

Of course, make sure your oven is completely switched off before starting to clean. Unplug your appliance from the mains and switch off the gas supply where possible. Gas can be very dangerous so always be super careful when cleaning any part of your oven and ensure all knobs and dials are set to OFF or zero.

Regular Cleaning

If you keep your grates and caps cleaned regularly you should be able to just put them in your dishwasher, as long as they have an enamel coating on the underside. When washing them on a regular basis, just use regular dish soap and water! Make sure to dry your caps thoroughly before placing back onto the hob.

Cleaning Burnt-On Food

Of course, there’s a big chance that there will be burnt-on food or just general charring on the caps. To remove this takes a bit more effort and sometimes plenty of elbow grease. If you don’t want to go gung-ho into cleaning your hob with something that may damage it, then take into account any manufacturers manual or appliance instructions. Below are some of the tried and tested ways to help get your hobs squeaky clean:

1. Ammonia or Oven Cleaner

If you’ve ever used a ziplock bag and an oven cleaning solution for the shelves in your oven, then try the same technique for your hob grates and caps. The fumes from the ammonia or oven cleaner loosen the muck and make things just like new again.

All you’ll need to do afterwards is wipe them with a cloth or rag over the sink and rinse; just make sure you’re wearing gloves when you do this! Always dispose of the bag and contents safely.

2. Washing Up Liquid and Elbow Grease

Washing up liquid is known to cut through grease on your dishes and tougher soiling can be removed by using a bit of effort and a non-metallic scouring pad. Soak the caps in the soapy solution for a little while before attacking them with a scourer.

3. Tougher Stuff

Sometimes a metal scourer or a brass brush can be needed for very stubborn burnt-on grease. This should only be used on the caps of a gas hob if they are made from stronger metal than aluminium. Always check which material your oven tops, grates and hob caps are made from before cleaning.

Conclusion

Now that your hob caps are clean this will help with even distribution of heat through your pans – meaning your cooking might even improve! All you have to do is keep them cleaned regularly to keep up with your newly successful cooking.

Make sure to replace all caps properly once they have been cleaned, check that they are perfectly slotted back on top of one another and it all looks flat when viewed from the side.

Hire a professional oven cleaner

These methods sound easy to pull off on paper, but if you lack enough time and especially the willpower, they can be quite overwhelming. Fortunately, you can save yourself the time and trouble by giving Shining Oven a call and booking a professional oven cleaning technician. The pro will disassemble your convection oven and clean each part separately in a matter of 2 to four hours. Afterwards, he will put everything back together and test run your convection oven. Your cooker will get back its former shine while you spend your time on more pleasurable activities. Book your oven cleaning today!